четвъртък, 14 ноември 2013 г.

WHITE BALANCE

WHITE BALANCE


When we speak of white balance will bear in mind the color temperetura or more precisely the type of light you're shooting  in. There are several basic types of light related to photography : sunlight , tungsten light (standard light bulb ), Fluorescent light ( coming from fluorescent lighting ) light from the flash. Depending on the type of light you're shooting  in, you have to set the camera to the appropriate mode of  white balance to achieve the desired effect. The color temperature is measured in Calvins and each source has certain values. In other words , the white balance is called white balance because you want when you make a picture the  white to be white , black to be black, and so on. Setting the wrong properties of the white balance, you risk the white color of your photos to be blue or yellow, which is annoying. Here are two examples of the same frame with different settings of white balance

white balnce


white balance


WHITE BALANCE ADJUSTMENT

Each camera has several modes to adjust the white balance : sunlight, shade , cloudy , incandescent light (standard light bulb ), Fluorescent light ( coming from fluorescent lighting ); light from the flash. Depending on the lighting conditions in which you shoot you have to set the appropriate mode of white balance so that white is white and so on, thus the machine understands how to set the color temperature and all  of the colors in the image will be the correct. In 90% of cases, usually automatic settings of white balance is doing a great job , but there are situations in which you must manually set the values ​​of the white balance, but it takes time and experience. Usually modern the digital cameras can shoot in RAW format, allowing you even if you got wrong white balance while shooting , then you can make adjustments in Adobe Lightroom for example.


In a few words , the white balance is to set the proper color temperature by the certain modes of  white balance of  the camera , which leads to correct reproduction of the colors in an image where the white is white, red is red , etc.

събота, 9 ноември 2013 г.

WHAT IS APERTURE, SHUTTER SPEED AND ISO


In the photography the concepts of aperture, shutter speed and ISO are of utmost importance, as well is the relationship between them. The key to achieve a technically good shot entirely depends on the values ​​of these three elements, which the improper use of any of these elements leads to the wrong functioning of the other ones. Conversely , if you set the correct values ​​of the three elements , achieving a technically correct picture is guaranteed ( do not confuse with technically correct aesthetic or creative ones ) . The camera has various shooting modes,  which it more or less regulates the correlation between aperture , shutter speed and ISO. For example, when you are on full automatic mode , the camera sets the values ​​that are appropriate for lighting conditions . In mode Aperture mode , you set the value of the size of the aperture (F 1,8; F4 or F 20 , for example) as well as ISO and camera sets the shutter speed , again taking into account the lighting conditions . The same goes for shutter speed mode, but  you are in charge of the speed - 1s . , 1/200 sec. , 1/8000 sec. But here comes the most interesting mode , namely the manual shooting mode . Called manual because it depends entirely on what values ​​you will assign to the three elements . And as it is understood in this mode you can fail in many shots , but on the other hand, it allows you to be more creative and to think out of the. I personally shoot only in this mode , which after many unsuccessful frames it allowed me to fully adjust the value and opportunities to get to know your body ( !?!:) .

APERTURE

Photography lessons for beginners

Shortly, the aperture regulates the amount of light that falls onto the light - sensitive matrix. When the aperture is more open, such as F 1,8; F 2 or F4 with certain lenses , more light reaches the image sensor and vice versa. When the aperture is closed, the less light reaches the sensor. On exactly the same principle works and the human eye , when it is very bright , your pupil shrinks , allowing less light  to reach the nerve. For how much is the aperture will be open also depends what part of the image will be on focus . Depending on the size of the aperture and the amount of light to achieve technically correct picture , you can adjust the shutter speed.

SHUTTER SPEED
Photography lessons for beginners

The shutter speed is the time at which light travels when it enters  in the lens until it reaches the matrix. It is called shutter speed because device, which allows light to reach the matrix is called shutter or curtain. Simply put , the shutter speed is the time during which this shutter or curtain is open . The longer time it is open , more light will reach the sensor , and vice versa. For example, you set the aperture to say F 8 in a normal sunny day. To make a nice shot without to blur something  you need a high shutter speed such as 1/ 200 of a second. But if you want to achieve a certain motion effect , showing the movement in the  frames , you will need to reduce the shutter speed , for example, to 1/5 of a second. But for that you have to close the aperture to allow less light to pass through, and the shutter or the curtain will stay open for longer. It's sounds complicated, but with more practice 
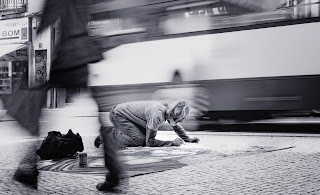
it works. Here is an example of a slow shutter speed , aperture F 32 ; ISO 200 and shutter speed 1/4 of a second. Thus anything that moves is blurred, showing the movement . And of course the obligatory thing when using slow shutter speeds , a tripod !

Photography lessons for beginners
ISO

ISO is the sensitivity of the matrix itself to light. The greater is the iso , the more it increases the sensitivity of the sensor and can shoot in lower light conditions. But the higher iso triggers the so-called digital noise, which increases with increasing values ​​of the ISO. This also depends on the type of matrix , for example by noise ASPC sensors is larger because the matrix itself is smaller in size , so-called crop . While full frame sensors (35mm ) the quality of the pictures remains at very high levels of ISO.


Finally , it takes a lot of practice to master the relationship between aperture values ​​, shutter speed , and ISO. But in contrast, some day you can manage your camera without thinking over these things , you just need great amounts of persistence and work !

вторник, 5 ноември 2013 г.

FIRST STEPS AFTER THE PURCHASE OF BODY AND LENS

FIRST STEPS AFTER THE  PURCHASE OF BODY AND LENS

Photography lessons for beginners

My WEBSITE

Needless to say about the emotions and impatience with which the beginner photographer is escorted immediately after the acquisition of the coveted technique . I personally , since I bought my first set ( the starter lens I sold after 2 weeks , confirming what was said above ) I was at a dentist , and my new camera was with me in the cabinet. It was the most pleasant dental appointment I've ever had ( and we all know there is no such thing , it is not possible ! ! ) Because my thoughts were elsewhere , you  know where. But this positive emotion will inevitably be replaced by a negative one, even annoyance and aggression. The reason is very simple - you just bought equipment for a lot of money , which invites you to go out and shoot, share your masterpieces with the world, which should fall at the feet of your photographic genius ... yes, but no . I am confident because I have gone through that in most of the cases you will not know how to do even one shot without the automatic shooting mode that hate to the extreme and that should not ever use ! And ultimately you got involved with photography for not shooting in auto mode . If so , sell your equipment and buy a 3D TV or lawnmower.

To protect you from your first wonderful moments and emotions from the acquisition of equipment to be spoiled forever , there is one rule for me , which is mandatory and it is:

READ YOUR BOOK WITH INSTRUCTIONS FOR THE CAMERA AND LENSES ! ! !

This is really a mandatory first step ! There is no way for you  to know your technique and you won’t be satisfied with the first few hundred photos not because the device " does not work" , but because you do not know its functions ! Shame on you if you spent let’s say 2000 euro for example and did not bother to read the small book of 100 pages! The instruction book itself will not embed talent, if you expect it, you will not start to do amazing photos after reading it, because the incredible photos require knowledge of photography, which we'll talk / write below. But reading the book will introduce you to the technical characteristics of the technique, it becomes clear what shutter speed , aperture , ISO , white balance , file format types , types of shooting modes , etc. When you read the book and learn to say 30% of the terms in it , this is a wonderful home that will allow you to build on your skills and abilities. Hundreds of times I saw posts in photographic sites of beginner photographers with themes like "the camera is not performing well" or " how particular photo has been made? ". For others, including myself,it requires  a lot of reading , thousands of photos in the bucket and a little satisfaction, but this is only temporary until the best photos start to get into our heads and memory cards:)


In the next post I will explain in the most simple way what aperture , shutter speed and ISO , or as they say in photography,The Wholly Trinity . :)

Ocean waves art
water photos
landscape prints
pier prints
summer prints
huge waves photos
ocean storm prints
ocean storm photos
hugea waves prints
canvas prints
landscape photos
water prints
Seascape prints
Portugal prints

събота, 2 ноември 2013 г.

CHOICE OF LENS

CHOICE OF LENS

Photography lessons for beginners


Logically , once you have selected and purchased your new acquisition , called DSLR body, the next and very important step (in my opinion even more important than the choice of the body) is to choose lens or lenses. The choice of lens is not so easy to take because of the huge variety of lense , which is really amazing .

Here I will open a bracket, so to speak, and I will tell you personal opinion based on personal experience in buying and choosing lens / s. Since you are still a beginner photographer who do not have any idea in focal length, chromatic aberration and depth of field, the most logical step is to buy the body and lens kit. Do not rush . You are familiar with the saying " cheap always comes out expensive" . The truth per se. This does not apply to high-class kit lenses of Canon or Nikon because in  that class the companies can not afford to compromise the quality ... so do it in the low end ! With great certainty I can tell you that even an amateur , for sure, if you want to progress as a photographer , you will change the lens kit most in a month working with him. And for sure you will lose money personal experience. So far I have bought and sold 5 lens when I did not properly assess the qualities or I was unhappy with them! And of course, always lose money. My advice is to read a lot before you decide to buy a lens, because if you don’t,  not prepared to throw a lot of money for nothing - more personal experience! So buy the body and the lens separately, even if you give a little more money, they will inevitably pay off because you will save yourself the difference of purchase as a new lens and sell second hand despite you have not used it much. The question here is whether you want to shoot cats (sounds really nice J) and flowers (nothing wrong in that) or you really want to grow as a photographer .

TYPES OF LENSES

The types of lenses are usually separate the fixed and zoom lenses . It is recommended that before you purchase a lens that you are headed to a particular genre of photography. This is because each genre has its unique shooting preferences and the lens is part of it. For example , if you are landscape photographer, as a main lens you need a wide angle lens- in other words, to " fit " more of the landscape. In portrait photography usually we use a fixed lens with a small aperture ( for better bokeh behind the model) and a longer focal length , which does not distort the facial features of the model. Again, if you have not pre- oriented genre will inevitably change the starter lens very quickly , so spend a little more time researching to get comfortable with the choice then .

FIXED LENSES

They are called fixed because they have a fixed focal length or in other words can not " zoom " .For example, there is a prime lens Canon 50 mm Aperture F 1.8. Usually, these lenses are better as construction since they have not so many parts, needed for the zoom lenses. Another feature for the fixed lenses is that they’re aperture is larger , which gives them two advantages- allows you to shoot in low light without bluring the image , and bokeh shots when it is clearly an attractive example of a lens with aperture 4 . The disadvantage of these lenses is that they can’t zoom without you moving closer or further away from the object of your attention. I.e. to zoom in and zoom out you can not rotate the focal length ring ( it does not exist) , but must activate your feet. Work only with fixed lenses leads you to develop your creative vision as a photographer , but this is very subjective statement. I think the only fixed lens that you must own is 50 mm 1.8, and Canon and Nikon have it, and it  is a pretty low price compared to the price of other lenses.

ZOOM LENSES


These are lenses with variable focal length , which means that they can approach or depart the object of attention without the photographer to move physically. Zoom lenses are suitable for beginner photographers for the simple reason that when you shoot you can try different focal lengths, different perspectives and angles . Therefore, all a starter kits include zoom lens which then it must be sold (if desired for further development). One difference between cheap and expensive zoom lenses is that the low-end by changing the focal length change its aperture – Canon’s 55-250 aperture is not fixed, but it is 4 / 5.6 . On the other hand, high-end , for example the Canon 17-40 mm aperture is 4 both in a focal length of 17 mm and at 40 mm. Avoid lenses with extreme focal lengths such as 18-135 mm, it does sound quite appealing because they cover a huge range , but it is at the expense of the image quality . I use 24-105 mm F 4L and 17-40 mm F 4L of Canon and now it runs great job, covering the focal lengths.

петък, 1 ноември 2013 г.

CHOISE OF DSLR BODY

THE CHOICE OF DSLR BODY

Photography lessons for beginners


No turning back and you have decided to deal with photography and the first thing you will need , it is a DSLR (Digital Single-Lens Reflex) body. In general, when you buy your first camera does not really matter what brand of body you will buy . Whether you buy a Canon or Nikon does not matter , this is a dispute between photographers, which seems like "my kid is the best ." At the highest professional level there may be very important , but I personally have not yet grown up to give an opinion on such a high level, where the real pro photographers use brands like Hasselblad, which although is a different format, has nothing to do with Nikon and Canon . The only factor relating to the choice of Canon or Nikon you need to consider is that if your friend or family member already has a body and lenses of the same brand. In that case, buy the same brand of body so you can swap lenses , accessories and other equipment. I use Canon , and two of my friends use Nikon ... stupid.

So ... once you have chosen  a particular brand body, basically nothing can go wrong . All functioning of the body could be benefits for you, especially when you  grab this device in your hands for the first time. I say this from personal experience. Perhaps only megapixels do not have much of a big difference. They are needed if we print very large images , billboards , etc. But when you reach that kind of printing, you will feel the need to change the body by yourself. Many pixels on a small matrix , APSC sensor (read matrix of the previous page of the site) could make the image more megabytes and create more noise to which we will discuss later. In general, the first body does not really matter for the novice photographer. Another important factor is to feel your body in your hands ( sounds strange , but it is a fact ) to find out whether it fits and it is comfortable . Generally, there is not much to go wrong with your choice of body when starting out in photography . Usually the first body serves to learn the basic photographic techniques of shooting to become a flair for photography, to know the basic functions of the body , it serves as a starting point in the way of the photographer . Believe me, if you are talented and you read a lot and practice a lot, if you are doing that is entirely up to you, then inevitably you will soon change that first body and hence already accumulated knowledge will only know what the next body have to be.


Buying a Canon , Nikon , Pentax or Sony really does not matter that much, but it is the first step, followed by the next big step- choose a lens or lenses for that body!